Help
Contents
- Map Layer Information
- The Map Display
- Other Map Tools
- Permalink
- Printing the contents of the map window
- Searching by address and postcode
- The documents
- Hosting information
- Cookie Policy
1. Map Layer Information
The first information window
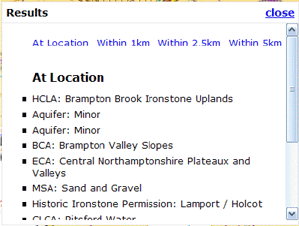
A double-click with the left mouse button on any part of the map will open up an information window or results page.
By default the information window will provide you with a list of what map layers are located at the place you have double-clicked. The list will include ALL map layers at that location whether they are displayed or not on the map itself. Also by default the information window will appear in the middle of the map display but you can move it if you click and hold your left mouse button at the top of the information window and drag.
In addition to the layer name some maps will include links to other web pages or web applications.

The second information window
Some links in the first information window will activate the opening of a second information window. These types of links from the first information window are to sections of text documents which form part of the website you are interacting with.
The second information window displays the text relevant to the map site or map layer. If you want to read more you can link to the relevant web page of the document by clicking on the ‘View this policy in context’ link.
2. The Map Display

Pan and Zoom tool comprising of the direction arrows (a), scale buttons and sliding scale bar (b)
Upon arrival the map display defaults to the smallest scale map of the area. At this scale the map shows the main transport network, settlements, and the boundary of the plan area.
In the top-left corner of the map display is the Pan and Zoom tool. This comprises of a sliding scale bar and also + and - buttons to display the map at predefined scales. There are direction arrows for scrolling above the sliding scale bar.
In the bottom left hand corner is a scale bar that corresponds the scale of map in the map display and below that are copyright notices if applicable to the map. On the bottom-right hand side is an overview map.
Zooming
There are two methods to change the map scale. The first method is to use the (+) and (–) scale buttons in the Pan and Zoom tool; clicking on them will zoom in or out to the next predefined scale.
The second method is to left-click and hold the handle on the sliding scale bar; you can then drag the handle up and down the sliding scale bar, finally releasing the mouse button when you reach the scale you wish to view.
As you zoom in or out, the map content will change. This has been done to keep the map display as clear as possible at all scales. The map content comprises of the base mapping and map layers that are displayed over the base mapping.
Base Mapping in the map display
Depending on the type of map in the display window the base mapping will change as you zoom in and out of the map. At the lowest scale (e.g. the default scale), only major roads and key settlements are labelled on the base mapping. When the largest scale has been set in the map display, minor road names and selected house numbers can be seen. Some maps will provide you with an option to change the base mapping (e.g. to toggle between an Ordnance Survey base map and aerial photography).
Map layers in the map display
Map layers are identified in the Legend to the left of the map display. More map content in terms of map layers (as indicated in the Legend) will become visible as you zoom in to larger scales. As you zoom out some layers will disappear. This is to ensure that the map remains easy to interpret and is uncluttered at viewing scales.
Panning
There are two methods to move around the map.
The first is to use the direction arrows; clicking on any of the four cardinal points of the buttons will pan the map in the direction that the button is pointing.
The second method is to drag the map, and is a similar method to the way that you can zoom in. To do this just left-click and hold the button down and drag the mouse in the direction you want to go and then release.
(NB. If Other Map Tools (see below) have been included in the Map Display and you select and use one of those tools you will need to click on the Navigate tool icon,

to be able to drag the map with your left mouse button)
3. Other Map Tools (Optional settings)
In the top right hand corner of The Map Display other tools may also be available for you to use. These tools allow you to undertake additional types of interaction with the Map.
All tools are activated by clicking on the tool icon with your left mouse button.
Navigate
Click on this icon if you want to be able to drag the map while holding down your left mouse button.
Measure Distance

Click on this icon if you want to be able to measure the distance between locations on the Map.
To measure a straight line, (or “as the crow flies”), click once with the left mouse button on the map at the location you want to start your measurement from. Move the cursor to where you want to measure to and then double click with the left mouse on your chosen location.
Straight line measurement
If you want to measure a distance that isn’t a straight line, click once with the left mouse button on the map where you want to start your measurement from and then keep clicking once on the map to add another point in your measurement until you reach the end point.
The distance measured is shown in metres and centimetres and in kilometres and metres. For example, a measurement of 1 kilometre and 425 metres will be shown as 1.425 km. The distance measured is shown in a box below the measuring tool icon.

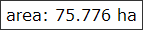
Measure Area

Click on this icon if you want to be able to measure an area on the Map.
To measure an area, click once with the left mouse button on the map at the location you want to start your area measurement from. Move the cursor and continue to click with the left mouse button as you draw the extent of the area that you want to measure. Double-click the left mouse button to finish drawing your area.
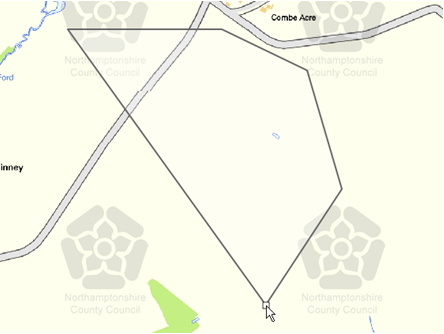
The area measured is shown in hectares depending on the size of the area measured. The area measured is shown in a box below the area measuring tool icon.
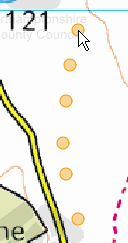
Draw Points

Click on this icon if you want to be able to draw points on the Map.
To draw a point, click once with the left mouse button on the map at the location you want to locate your point. Continue in the same manner to draw more points.
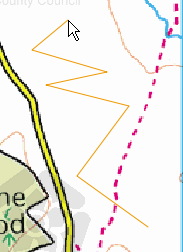
Draw Lines

Click on this icon if you want to be able to draw lines on the Map.
To draw a line, click once with the left mouse button on the map at the location you want to start your line from. Move the cursor and continue to click with the left mouse button as you draw your line. Double-click the left mouse button to finish drawing your line.
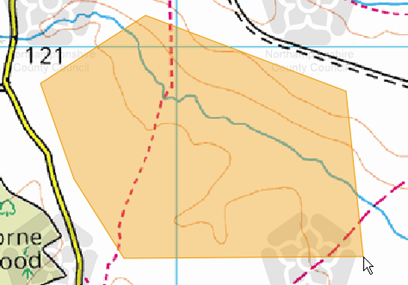
Draw Polygons

Click on this icon if you want to be able to draw polygons on the Map.
To draw a polygon, click once with the left mouse button on the map at the location you want to start your line from. Move the cursor and continue to click with the left mouse button as you draw your polygon. Double-click the left mouse button to finish drawing your polygon.
The Overview Map
The Overview Map with minimise button
The overview map is located in the bottom right hand corner of the main map display. This map can be minimised using the minus (-) button and maximised using the plus (+) button.
The overview map is dynamically linked to the main map display. It shows you where the view you have selected in the main map display is located in relation to the entire map area that can be shown in the map display. The red outline box represents the map coverage in the main map display.
If you pan, scroll and zoom in the main map display the map display in the overview map will also change in accordance with your interaction. You can also click and drag on the red outline box in the overview map to change the viewing location in the main map display.
The Legend/Key
The legend or key contains all of the map layers that are displayed over the base mapping in the map display. Map layers are grouped thematically. The legend groups can be collapsed to save space by clicking on the theme titles. Within the groups, the individual named map layers can be turned on and off by clicking on the checkboxes, or the layer names. Just above the legend are links to switch all policies on or off.
The top of the legend lists links to other web pages.
4. Permalink
As you change the map display the information in the address bar of your web browser also changes. This allows you to bookmark (or permalink) the map display you have chosen and return to it later even if you close the website. Furthermore you can copy and paste the information in the address line and send it as part of an email to other users if you want them to view the same map display as you.
5. Printing the contents of the map window
Printing the contents of the map window can only be achieved if 'Background Printing' is activated in your web browser.
To activate 'Background Printing' in Internet Explorer:
- Select 'Tools', 'Internet Options'
- Click the 'Advanced' Tab
- In Settings scroll down to the section titled 'Printing'
- Click on the check box 'Print background colours and images'
To activate 'Background Printing' in Mozilla Firefox:
- Select 'File', 'Page Setup
- Click on the check box 'Print background (colours and images) in the Options section
You may only print a map for personal use. Your printed map will include the Council watermark, the Ordnance Survey (OS © Crown Copyright notice and the OS licence number
6. Searching by Address and Postcode
To search by address or postcode, move your mouse over the grey tab on the left-hand-side of the map. This will open up the search menu. Then simply type the postcode or address into the search box and click on the "Go" button. There will be a slight delay whilst your search is performed by the server, and you will then be shown a list of locations that matched the address or postcode you supplied. Clicking on one of these locations will close the results, and centre the map on the location you chose.
7. The Documents
The first page when the documents link is selected lists the documents available on this site. Once you have selected a document, the contents page of that document is displayed.
At the top is a link to the list of all policies contained in that document, and selecting any policy from that list will display the text for that policy. When viewing a policy in this way, a link is also shown to read the policy in the context of the whole chapter it belongs to.
The chapters, appendices and relevant glossaries for the document can also be accessed from the contents page.
8. Hosting Information
Website designed, built and hosted by Blue Fox Technology Ltd in association with Global Mapping Ltd. Powered by Opus v3.0.0
9. Cookie Policy
This site does not use any third-party cookies.
We do however use the following cookies as categorised by the International Chamber of Commerce:
-
Session Cookie (Category 1: Essential Cookies)
This cookie is essential to allow the web server to keep track of your session whilst on this site and ensure that the correct content is delivered to your browser.
The cookie is deleted when you close your browser. -
Language Preference Cookie (Category 1: Essential Cookies)
This cookie is essential to allow you to view the site correctly. It is used to store language preferences (in the case of multilingual pages) and ensure that the correct language version of the page is delivered to your browser.
The cookie is not deleted when you close your browser.
By using our online service, you agree that we can place these types of cookies on your device.